These are the original windows in the garage. They were parts of double-hung windows that were just framed into the wall. They are small and scuffed and hard to see out of.
This is the awesome big window we got for our bathroom remodel. Since purchasing it (at a building materials salvage place) we totally changed our plans for the bathroom. So this window was up for grabs.
So Jeremy cut the other window out and began the process of making the hole bigger for the new window.
(uh, yeah, this was a month ago - a little more snow then!)
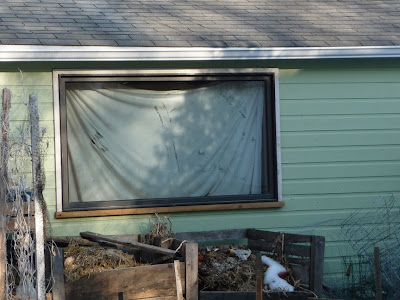
Here's the window today:
Looks slighly trashy with the old curtain hanging there, but it's not good to have sunlight on the mushroom logs, and there are a lot (A LOT) of logs in the garage!
So many logs it's hard to get them all in view - I had to get up against the wall behind the bikes to get that last shot. There are plenty more logs stacked behind that giant stack.
Jeremy's estimates were a bit off so it looks like he has some extra logs. So if anyone needs some logs for innoculating mushrooms, let us know!
Wednesday, March 30, 2011
Sunday, March 27, 2011
Snow awning
Some people have awnings on their homes. These are often made of fabric, sometimes of metal or maybe wood. We only have awnings in the winter. They're made of ice.
When it gets just warm enough, the sheet of ice/snow on the low-slope roof will start to slide off. Ever. So. Slowly. The sheets of ice will be sticking out one to two feet before they finally break off.
One half falls harmlessly to the ground. The other half falls onto the roof below (with a mighty crash), slides down that roof, then onto the sidewalk and plants below (thereby utterly destroying a couple of the cages around our blueberries.) We'll have to do something about that next year.
Saturday, March 26, 2011
Winter doldrums
After a week or two of lovely warm weather (and by warm I mean 40s!) we got another 5 plus inches of snow this week. And the temperatures have dropped back to the teens to low 30s.
It seems like everyone everywhere is talking about baby chicks, baby plants, spring, spring, spring!!
Right now, spring and summer feel so far away ... I've given up all hope of that blessed time ever arriving.
I was looking through pictures of our yard from the past two summers. So much light and warmth and so many flowers! I want a time machine so I can fast forward to June or July!
I saw this leaf in the snow. It must have been warmed by the sun and it's slowly sinking through the snow. Pretty cool.
(and by "cool" I mean: trying to find anything redeemable about having more snow! grr.)
Monday, March 14, 2011
More logs
Jeremy spent this weekend getting more logs - finally! There have been all sorts of delays this year so I think he is excited to finally have another load to work on.
Van is partially emptied.
Logs are piling up.
These are much mossier and snowier than the last batch.
Now that is a lot of logs!
That is all oak. Jeremy also picked up a load of Poplar which we're storing at a friend's garage. He'll be doing totem method on those. More on that when he gets to that garage full of logs!
Sunday, March 13, 2011
Fun with recycling, part 2
There is a scene in the movie Never Been Kissed that has always haunted me a bit. Drew Barrymore’s character is having a relaxing evening at home, alone, working on some needlepoint. She is making a cute little pillow. She finishes the pillow and takes it to a bedroom where she sets it on the bed and admires it with love. Then you realize there are a LOT of other cute little pillows! This woman obviously has no life. On the one hand I think, “What a loser!” and on the other hand I think, “Hey, I resemble that!” It wasn’t too many years ago you could find me curled up in my one-room basement apartment, watching endless re-runs of Stargate and quilting till I had no feeling left in my fingers. Talk about nerdy. =) (Hey – I wasn’t always an urban homesteader!)
Anyway, I’ve been making some pillows and I always think of that movie and hope I’m not that bad.
I couldn’t be, because these are cool pillows! I had a bunch of leftover men’s ties from a tie skirt project and – in another flash of inspiration – realized these could make cool pillows. I was looking at the skinny part of the tie and realized here was all this fabric already in perfect 2” strips. So I made some pillows in the Log Cabin Style.
The first step is to pick a few ties. For a traditional Log Cabin you want one value for one side and a different value for the other side - light and dark, or just two distinct colors. And I pick a tie end for the center that is different from the rest of the ties.
I use a zig-zag stitch to topstitch all the ties together. Yep, the whole tie with the stuffing inside and all. It gives it a nice puffy feel at the end.
Each piece is just a little longer than it needs to be (and I cut as I go). This is because silk is shifty and sometimes you'll find it's a bit shorter than you remember!
I don't sew down the tie tip, so when you get this part hold that tip up.
and then...
...just...
...keep going!
At some point this might happen - the tie suddenly gets thicker! This is usually where I stop. But you can go ahead and sew it on; the extra bit can be trimmed off later (unless you want a really wacky shape to your pillow, which is fine).
Done!
Here are some others I made:
Even after all those, there are still lots of beautiful silk scraps to use, in which case you can try the crazy quilt method.
You just cut out random shapes (often triangular) and sew them down on a square of fabric.
Just...
...keep...
...adding!
The cool thing about silk is that it can be forced into some curves that are too difficult with cotton.
Done! (The curve in the blue tie in the upper left was a little too extreme and left a couple puckers. Oh well.)
Here's another one:
I should note that most of these aren't actually made into pillows yet - they're just the tops.
All of these will be heading to Kansas City with me (along with the bags) and if there are any left, they’ll be up on Etsy!
Anyway, I’ve been making some pillows and I always think of that movie and hope I’m not that bad.
I couldn’t be, because these are cool pillows! I had a bunch of leftover men’s ties from a tie skirt project and – in another flash of inspiration – realized these could make cool pillows. I was looking at the skinny part of the tie and realized here was all this fabric already in perfect 2” strips. So I made some pillows in the Log Cabin Style.
The first step is to pick a few ties. For a traditional Log Cabin you want one value for one side and a different value for the other side - light and dark, or just two distinct colors. And I pick a tie end for the center that is different from the rest of the ties.
I use a zig-zag stitch to topstitch all the ties together. Yep, the whole tie with the stuffing inside and all. It gives it a nice puffy feel at the end.
Each piece is just a little longer than it needs to be (and I cut as I go). This is because silk is shifty and sometimes you'll find it's a bit shorter than you remember!
I don't sew down the tie tip, so when you get this part hold that tip up.
and then...
...just...
...keep going!
At some point this might happen - the tie suddenly gets thicker! This is usually where I stop. But you can go ahead and sew it on; the extra bit can be trimmed off later (unless you want a really wacky shape to your pillow, which is fine).
Done!
Here are some others I made:
Even after all those, there are still lots of beautiful silk scraps to use, in which case you can try the crazy quilt method.
You just cut out random shapes (often triangular) and sew them down on a square of fabric.
Just...
...keep...
...adding!
The cool thing about silk is that it can be forced into some curves that are too difficult with cotton.
Done! (The curve in the blue tie in the upper left was a little too extreme and left a couple puckers. Oh well.)
Here's another one:
I should note that most of these aren't actually made into pillows yet - they're just the tops.
All of these will be heading to Kansas City with me (along with the bags) and if there are any left, they’ll be up on Etsy!
Wednesday, March 9, 2011
Fun with recycling, part 1
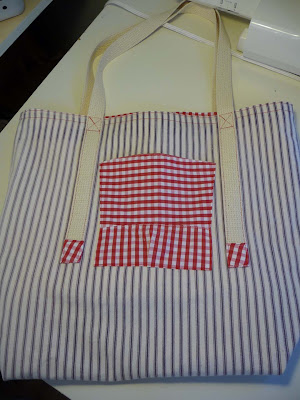
I started making reusable shopping bags last winter when I was raising some funds to go on a trip. I kept making them for sale at the farmers market. I’ve had some success with them despite the fact that they aren’t cheap. (I can’t compete with 99-cent bags from Target!) But they are fully lined, have pockets, they’re sturdy, and they’re unique (and you aren’t acting as a walking billboard for some store!).
After making these for several months I started making smaller kid-sized ones. Might as well get kids into using re-usable shopping bags at an early age. And they need those smaller bags. I’ve seen more than a few kids helping with the groceries and dragging bags along the ground because the bags are so big!
Anyway, this post is supposed to be about recycling. Most of these bags have been made with new material and I’ve been trying to figure out how to do this more recycled. I got some great curtain scraps from a friend last year and made a couple bags out of those. A month or so ago another friend gave me a huge pile of old drapes from her house. They are very sturdy, almost like canvas, and the only sign of wearing is that parts of them are faded by the sun. I thought these would make great bags. And then somehow (I don’t know where these flashes come from) I thought it would be fun to line these with shirts!
I had gotten a small collection of men’s and women’s shirts from a bulk thrift store a year or two ago. I reasoned they would be great for fabric since people wouldn’t use them for clothes (due to holes or other problems). I sewed the fronts together, removed the buttons, and sewed the shirt together into the shape I needed for the bags. Sleeves and collars became pockets on the inside and outside.
this was a smaller fitted one, so you can see the fitted part and where the arms would be going out. This is the inside of the bag...
And here's the outside, with a bit of sleeve for the pocket.
Yes, I would have given this shirt to the thrift store too!
This pocket is part collar and part sleeve
In the end I think they turned out very well. These won’t be turning up on my etsy page just yet. I’m going to an Earth Fair in Kansas City in April. There is a group down there putting together some tables of crafts and things made with recycled materials, etc. So the bags will be there, and if there are any left they’ll be up on etsy soon after.
Sunday, March 6, 2011
Snow chickens
Everyone keeps asking how the chickens are doing. They're fine. I think they too will be happier when it gets warmer. I've dug out their run twice so they could have more space to stretch their legs.
Our chickens prefer not to step on snow - but they love eating it!
When Jeremy cleans out the coop he has been keeping the main door open so the girls can get out and wander around a bit.
mmmm! snow!!
hello
brr, that ice is cold on the feet!
Our chickens prefer not to step on snow - but they love eating it!
When Jeremy cleans out the coop he has been keeping the main door open so the girls can get out and wander around a bit.
mmmm! snow!!
hello
brr, that ice is cold on the feet!
Saturday, March 5, 2011
Freezer challenge - success?
Some of you may remember the freezer challenge from last year (here, here, here, here, and here!). I haven't posted anything about that recently, but I consider it an ongoing challenge to use up the things in there.
So when Jeremy said he'd be having volunteers in to help him inoculate logs, I thought this would be my chance. We have so much in the freezer! Surely there are enough beets and corn and whatever else to make dozens of pots of soups and stews and chowders.
For the first week I made borscht. That used up the rest of the cabbage we had, as well as beets from the freezer and carrots, potatoes, and onions from the root cellar.
Next I decided to make a batch of cheddar corn chowder. We didn't have any chicken broth on hand, so we dug out a bunch of carcasses and bones and chicken feet from the freezer, carrots and onions from the root cellar, and I made up a huge batch of chicken broth.
But then we started digging through the freezers and discovered: WE DON'T HAVE ANY CORN LEFT! I don't know how that is even possible. I thought we had enough to survive the apocalypse. But I guess we have been making a lot of corn chowder, corn pudding, corny corn bread, soups, etc, etc. So, somehow or other we used up all the corn!
Back to the drawing board.
And back to the root cellar for carrots, potatoes, and onions!
I decided to make some chicken soup. I sauteed a couple onions,
threw in some carrots, celery, chicken (from the freezer of course),
added the chicken broth and set it all simmering. Towards the end I added the potatoes and the rest of a box of bow-tie pasta.
And it was pretty tasty!
Now I realize what I must do (and have been avoiding like the plague for a couple years now) is inventory the freezer so I know just what the heck is in there. It seems like an especially thankless and cold job to do (especially when it's not much warmer outside the freezer than inside!). But then I had a realization: I would be willing to do it for a blog post.
Sometimes boring or annoying or tiresome tasks can be made slightly more enjoyable by the thought of blogging about them. I don't know - is that just me?
So when Jeremy said he'd be having volunteers in to help him inoculate logs, I thought this would be my chance. We have so much in the freezer! Surely there are enough beets and corn and whatever else to make dozens of pots of soups and stews and chowders.
For the first week I made borscht. That used up the rest of the cabbage we had, as well as beets from the freezer and carrots, potatoes, and onions from the root cellar.
Next I decided to make a batch of cheddar corn chowder. We didn't have any chicken broth on hand, so we dug out a bunch of carcasses and bones and chicken feet from the freezer, carrots and onions from the root cellar, and I made up a huge batch of chicken broth.
But then we started digging through the freezers and discovered: WE DON'T HAVE ANY CORN LEFT! I don't know how that is even possible. I thought we had enough to survive the apocalypse. But I guess we have been making a lot of corn chowder, corn pudding, corny corn bread, soups, etc, etc. So, somehow or other we used up all the corn!
Back to the drawing board.
And back to the root cellar for carrots, potatoes, and onions!
I decided to make some chicken soup. I sauteed a couple onions,
threw in some carrots, celery, chicken (from the freezer of course),
added the chicken broth and set it all simmering. Towards the end I added the potatoes and the rest of a box of bow-tie pasta.
And it was pretty tasty!
Now I realize what I must do (and have been avoiding like the plague for a couple years now) is inventory the freezer so I know just what the heck is in there. It seems like an especially thankless and cold job to do (especially when it's not much warmer outside the freezer than inside!). But then I had a realization: I would be willing to do it for a blog post.
Sometimes boring or annoying or tiresome tasks can be made slightly more enjoyable by the thought of blogging about them. I don't know - is that just me?